Specimen Collection
All test orders have mandatory information fields, including
Patient’s identification: full name, gender, date of birth, location details, unique identifier (FIN or NRIC)
Time and date of specimen collection
Type of primary specimen and anatomic site of origin, where relevant
Test(s) ordered
Ordering clinician’s identification: name and MCR number of clinician, destination for report, and contact details
Clinically relevant information, e.g. family history, travel and exposure history, communicable diseases, previous medical conditions, current medications. Provision of relevant information aids interpretation of results.
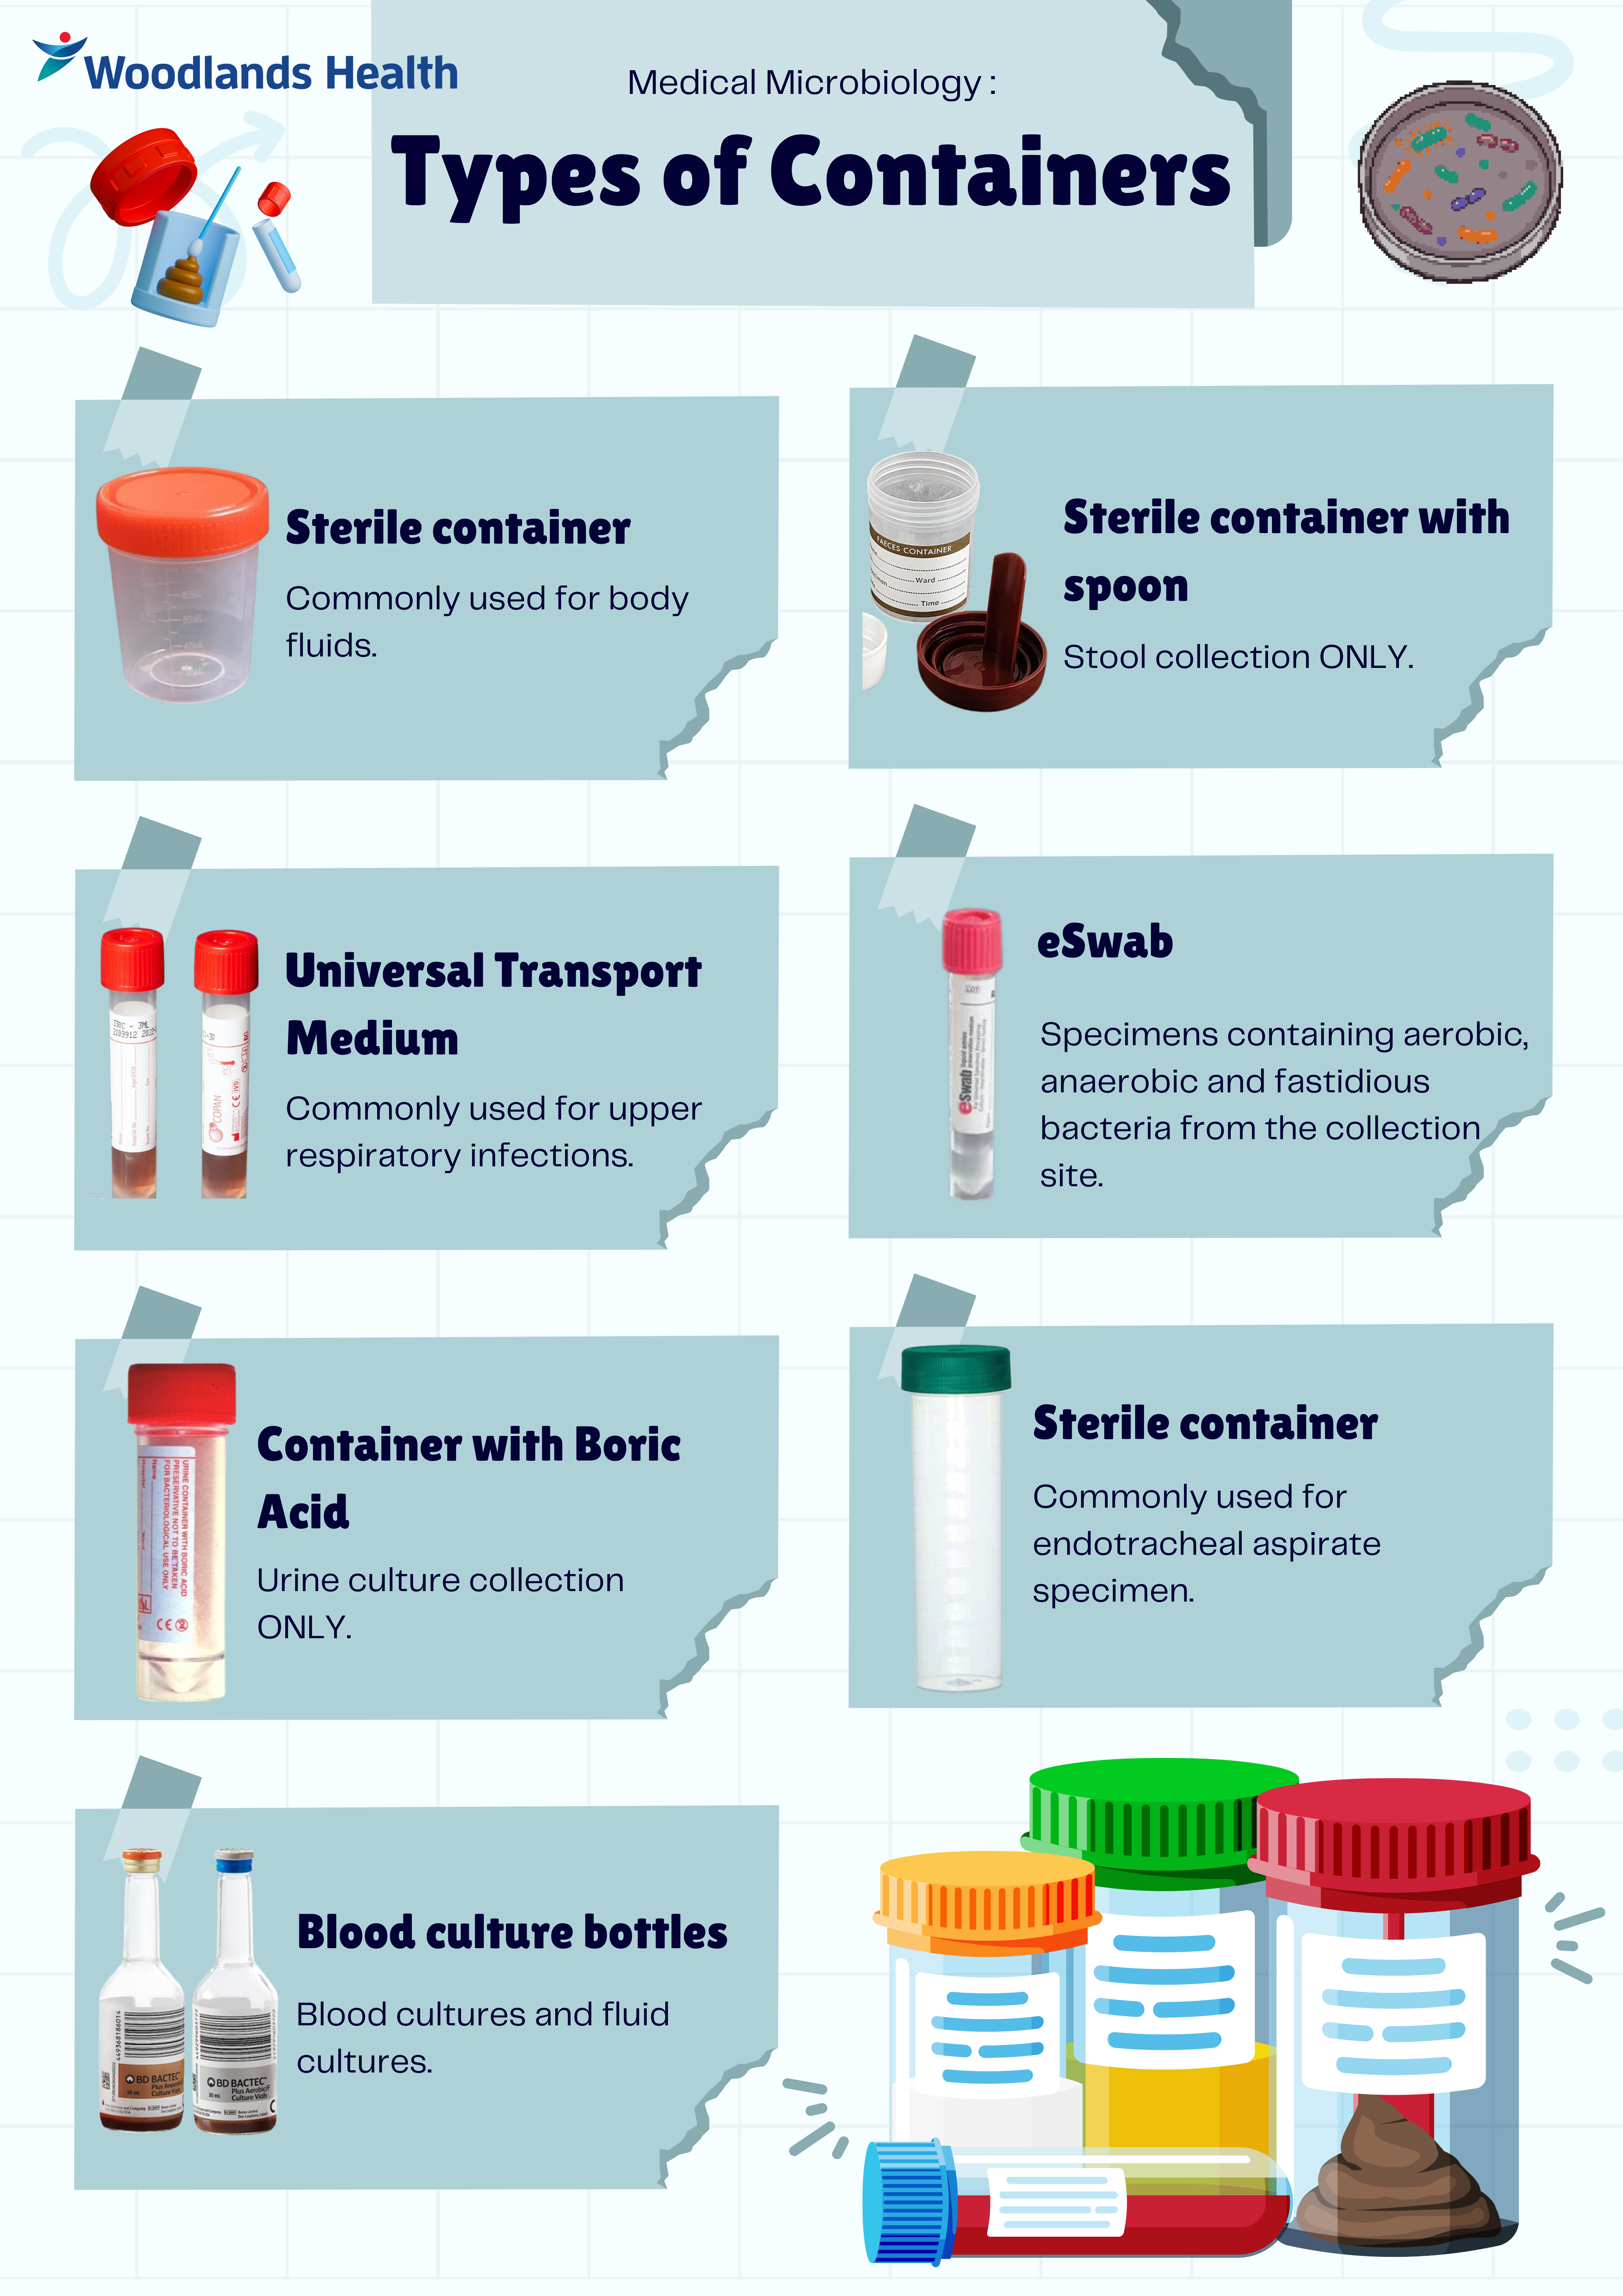
- To ensure the optimum condition of specimens for the most accurate test results, refer to the test catalogue in this service guide before collecting specimens from a patient. This information includes the appropriate specimen type, specimen container, and minimum volume (for liquid specimens).
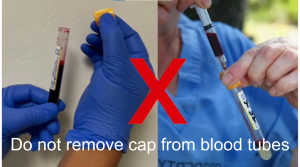
Do not remove the cap of blood tubes during specimen collection.
- Special requirements and instructions to patient are to be clearly indicated from the ordering clinician. All patient specimens must be accompanied by a request form (manual or electronic) and each specimen container must be labelled correctly to prevent errors in reporting of results.
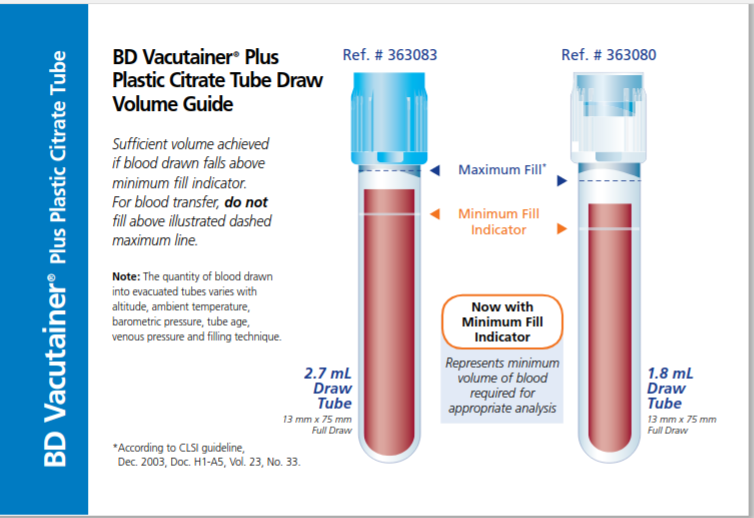
- For blood specimens, collect blood until the volume reaches the marking on the tube. Underfilled or overfilled specimens are unsuitable for testing and may be rejected by the laboratory.
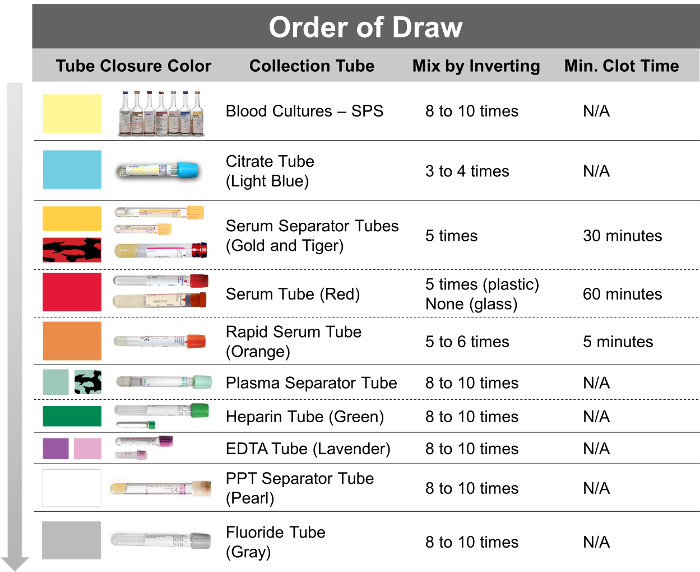
- For multiple test orders requiring blood collection of different type of specimen tubes, follow the proper order of draw as indicated in Correct Order of Draw and Citrate Tube Draw Volume Guide. Refer to ‘Policy on venepuncture’.
- The laboratory classifies specimens as ‘recollectable’ or ‘non-recollectable’ depending on whether a specimen can be collected again and still produce a similar test result. Most blood and urine specimens are recollectable (with a few exceptions). Examples of non-recollectable specimens include tissue, body fluid, toxicology specimens (potential medico-legal cases), blood cultures, and blood specimens for synacthen test or oral glucose tolerance test.
For blood collection requiring multiple different specimen tubes, follow the order of draw for blood collection from top to bottom:
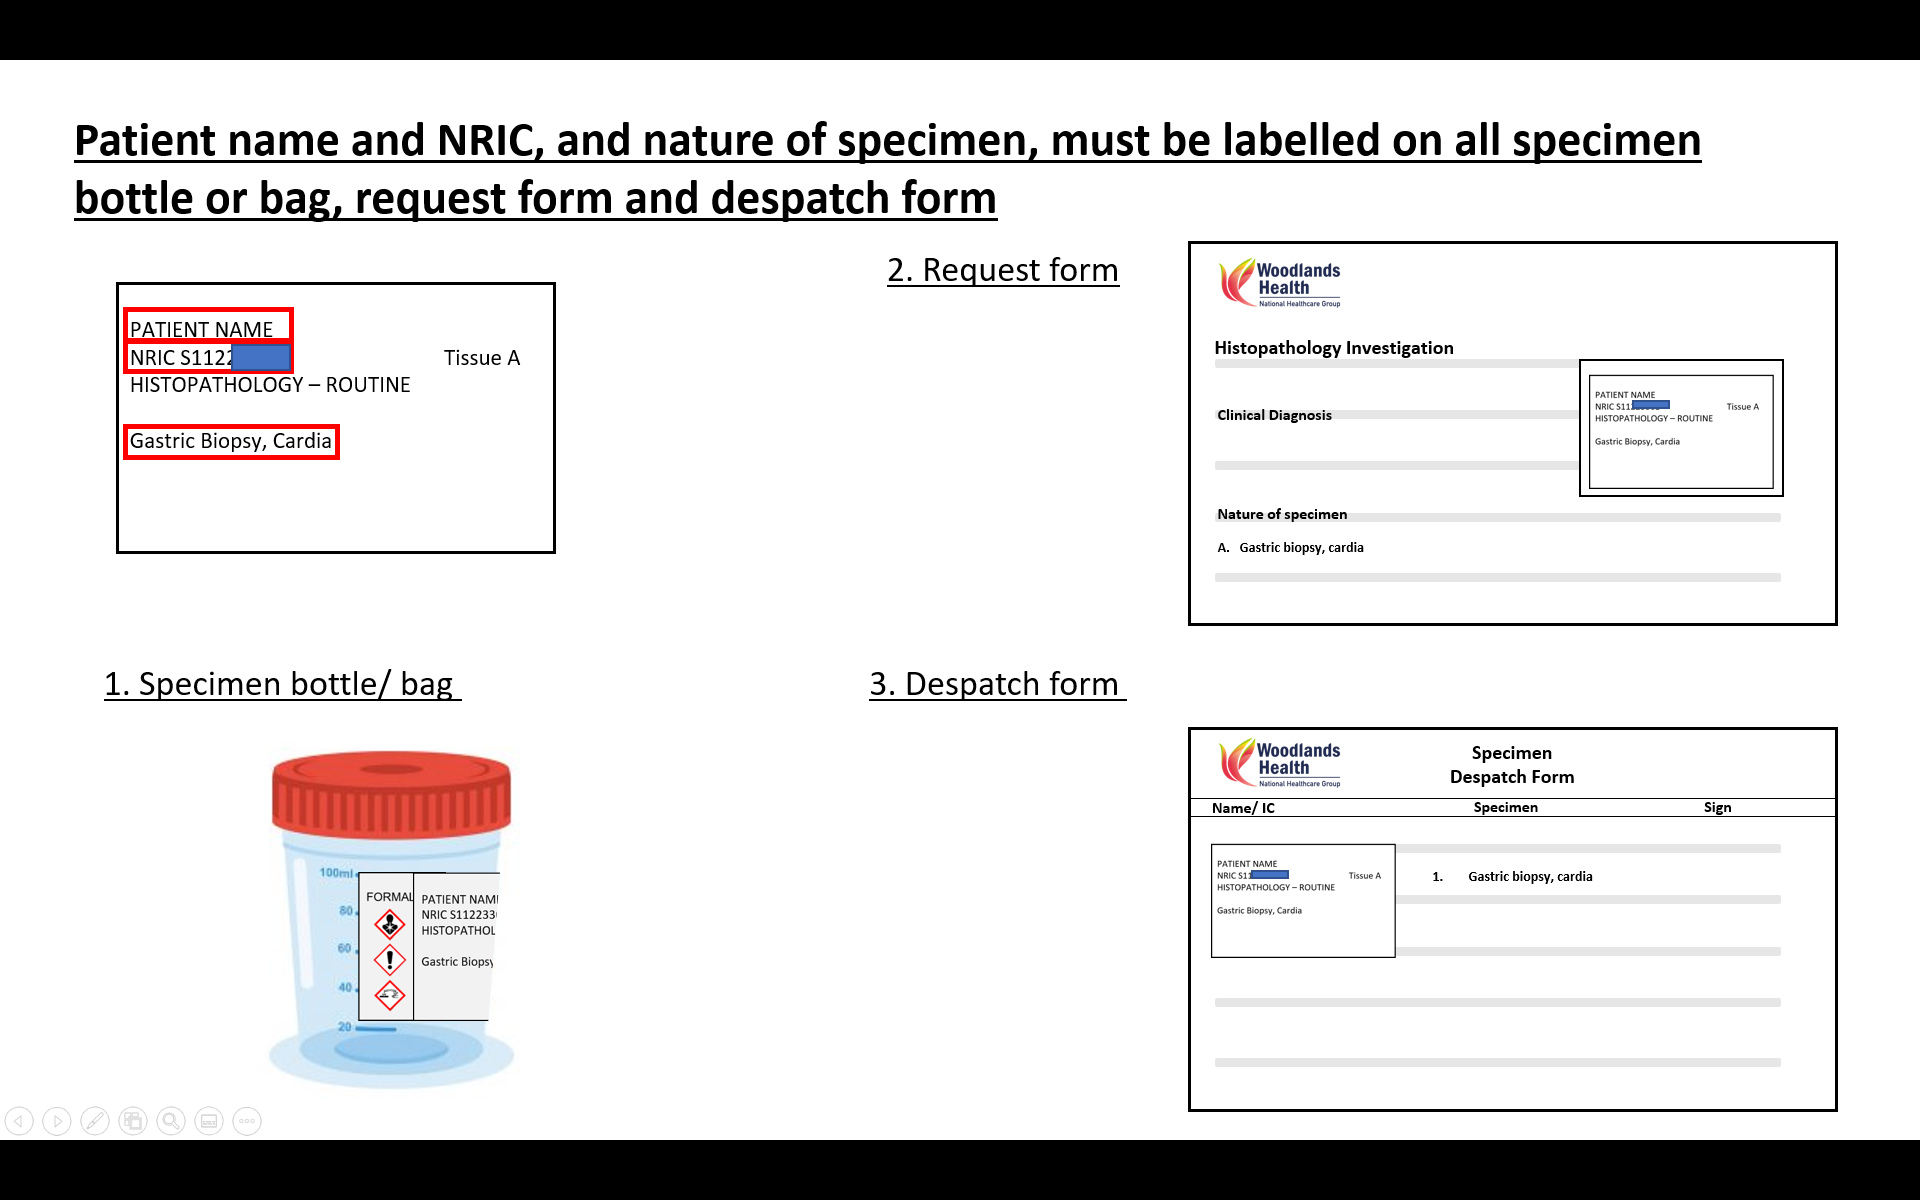
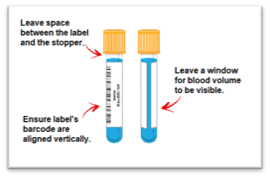
All specimens must be labelled according to the accompanying illustrations (Figure 1). The patient must be clearly identified on both the specimen and the test request form. Laboratory personnel is not allowed to make amendments on the specimen label or test order.
Figure 1. Correct specimen labelling
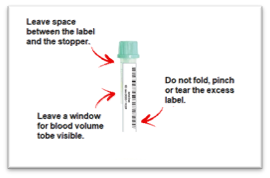

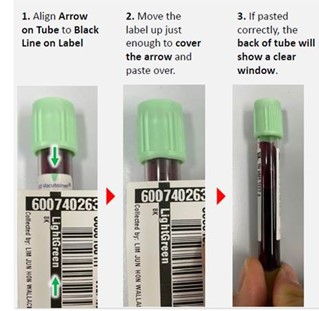
Barcode labels must be placed lengthways on the specimen tube, and not wrapped horizontally around the tube. The laboratory’s barcode scanner can read the labels only if they are placed lengthways. Refer to Figure 2 on how to label a tube correctly.
Figure 2. Correct way of labelling
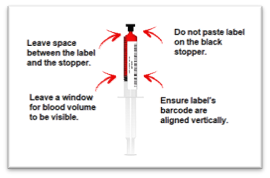
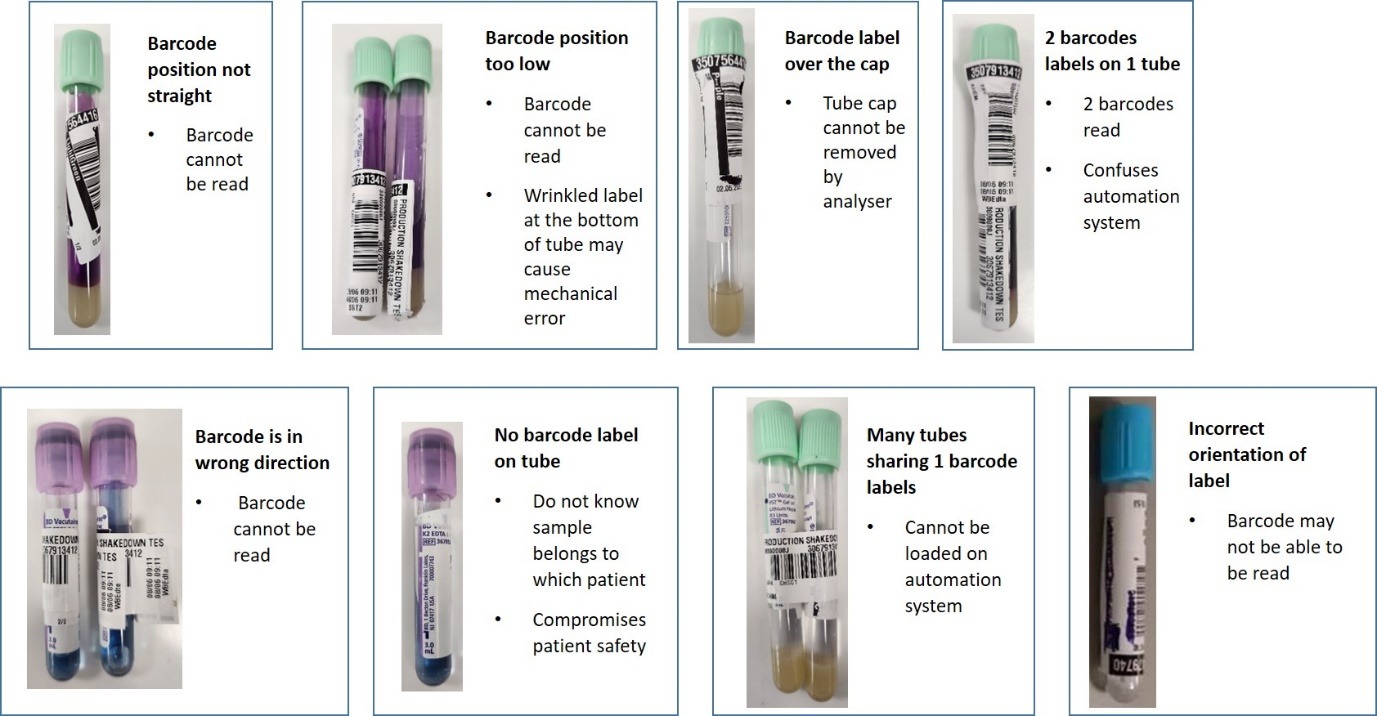
Improper labelling are not accepted by the laboratory automation system, and manual intervention is required to reprint the labels, lengthening turn-around time of results and potentially leading to errors. Refer to Figure 3 for incorrect labelling.
Figure 3. Improper labelling
Specimens labelled with a patient’s initials rather than full name are not accepted unless both date of birth and NRIC or FIN are present.
Specimens that has been relabelled (with crossing out visible on the specimen tube) are not accepted.
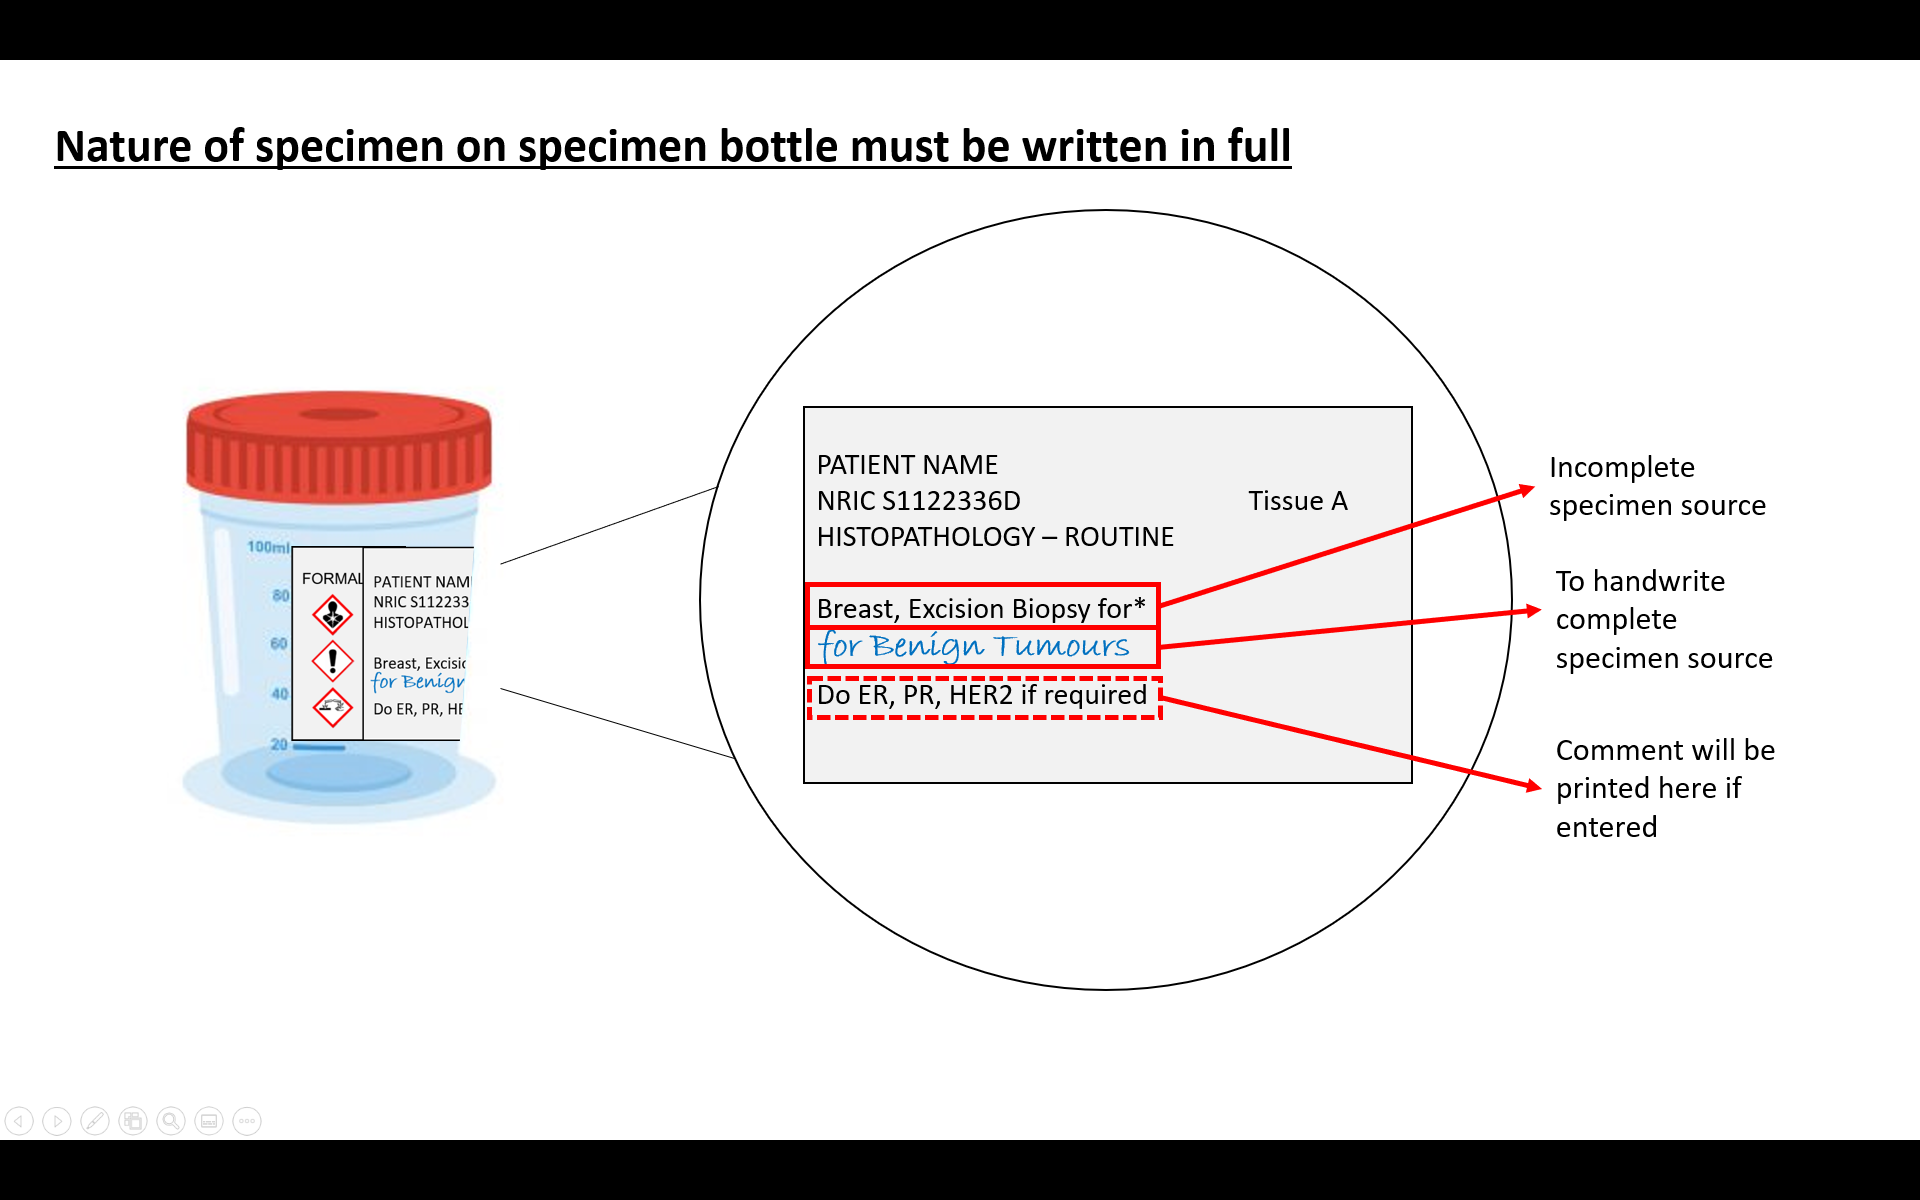
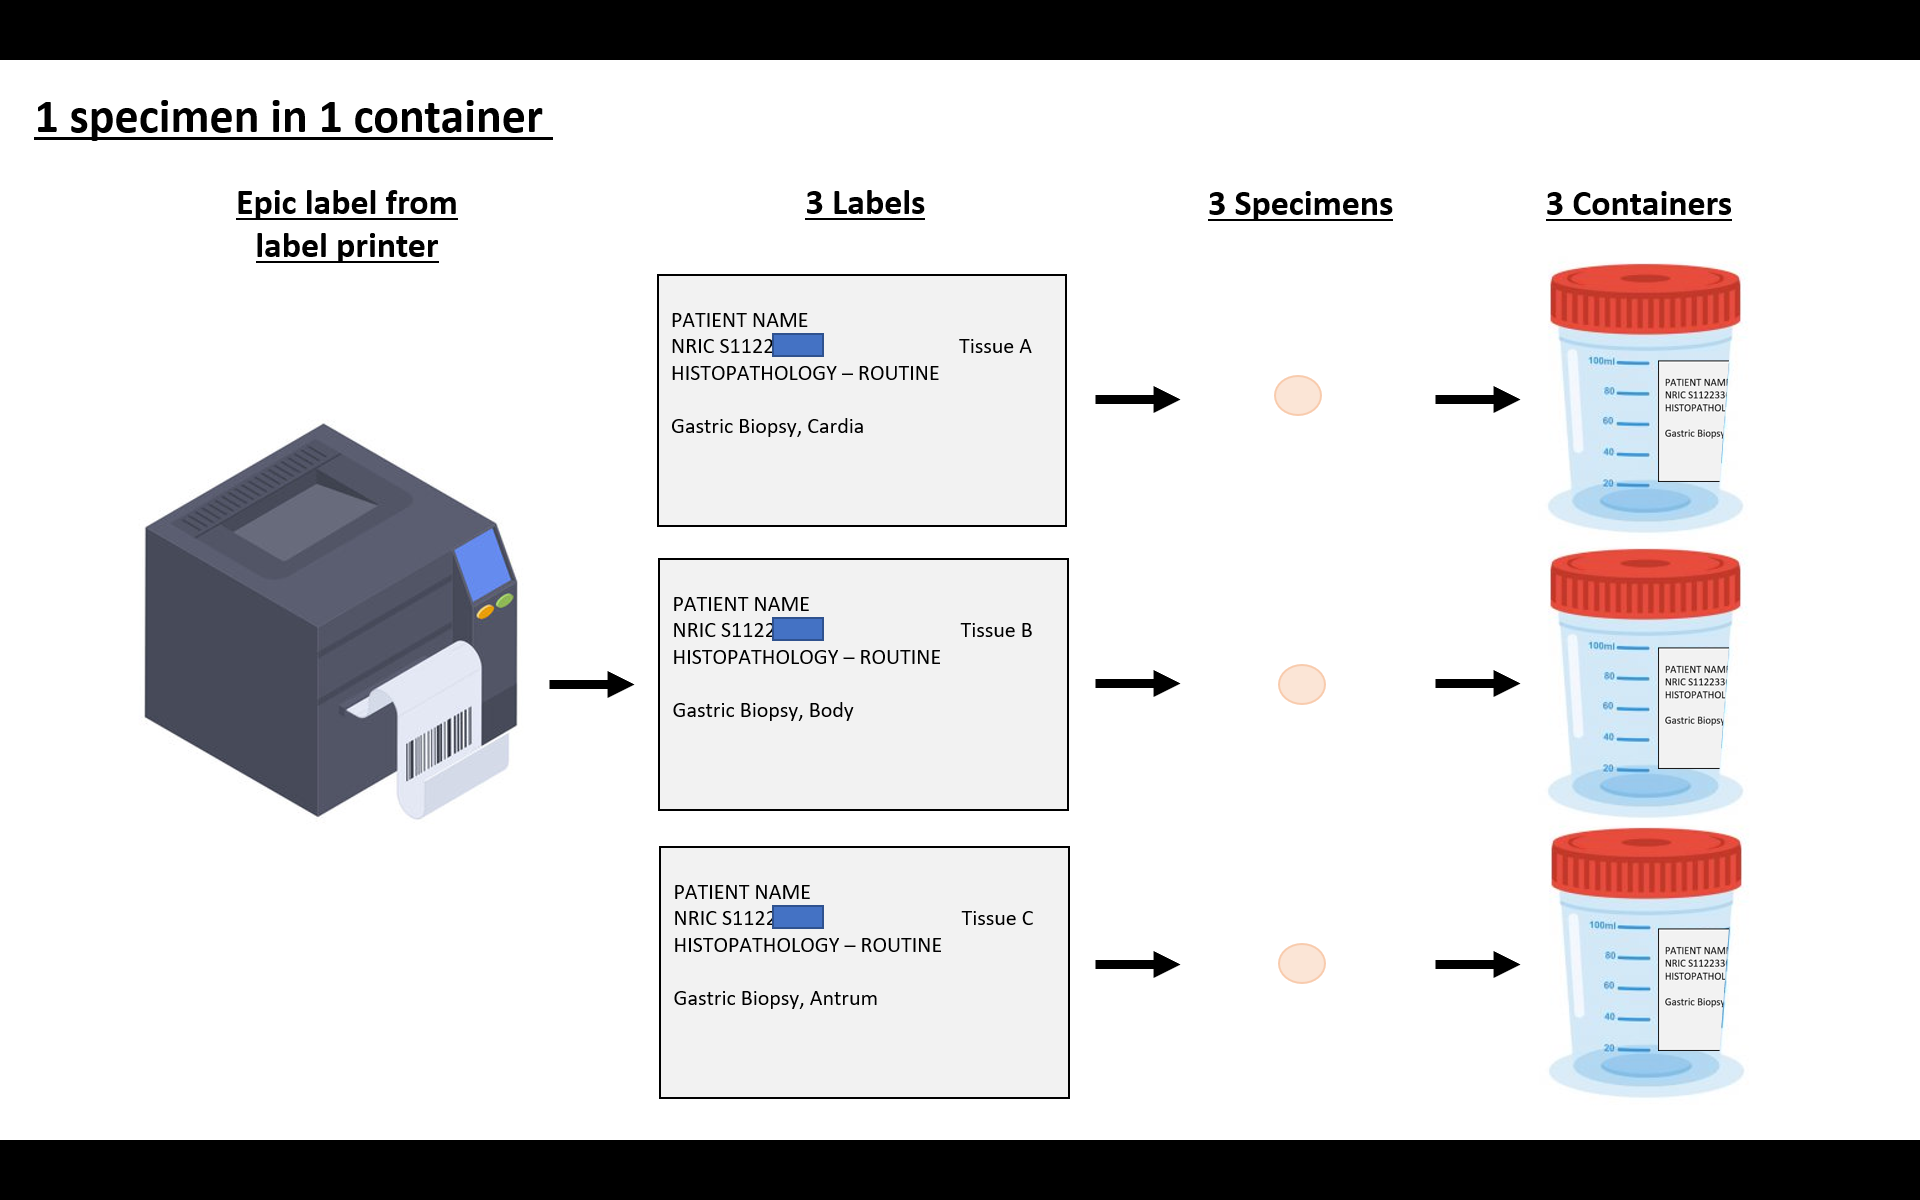
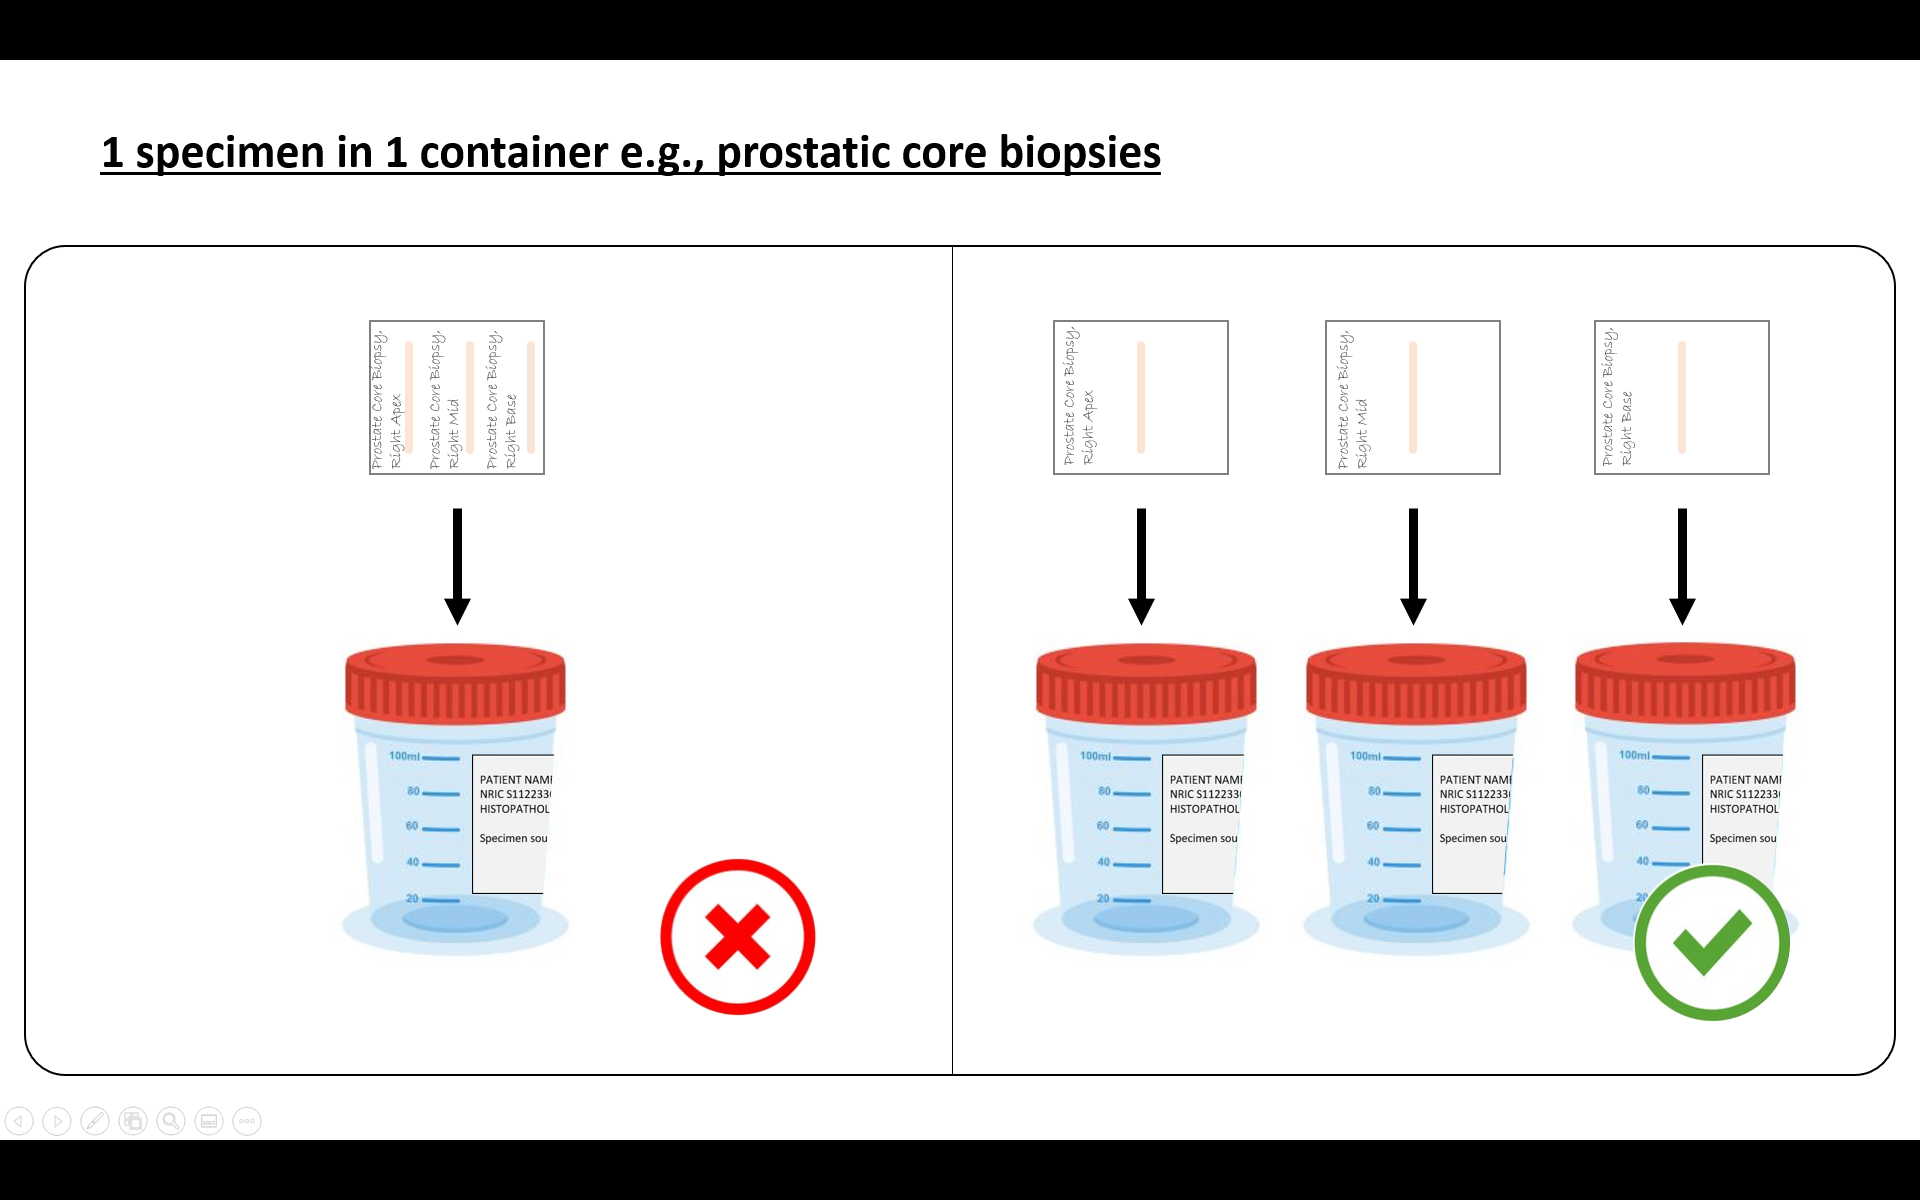
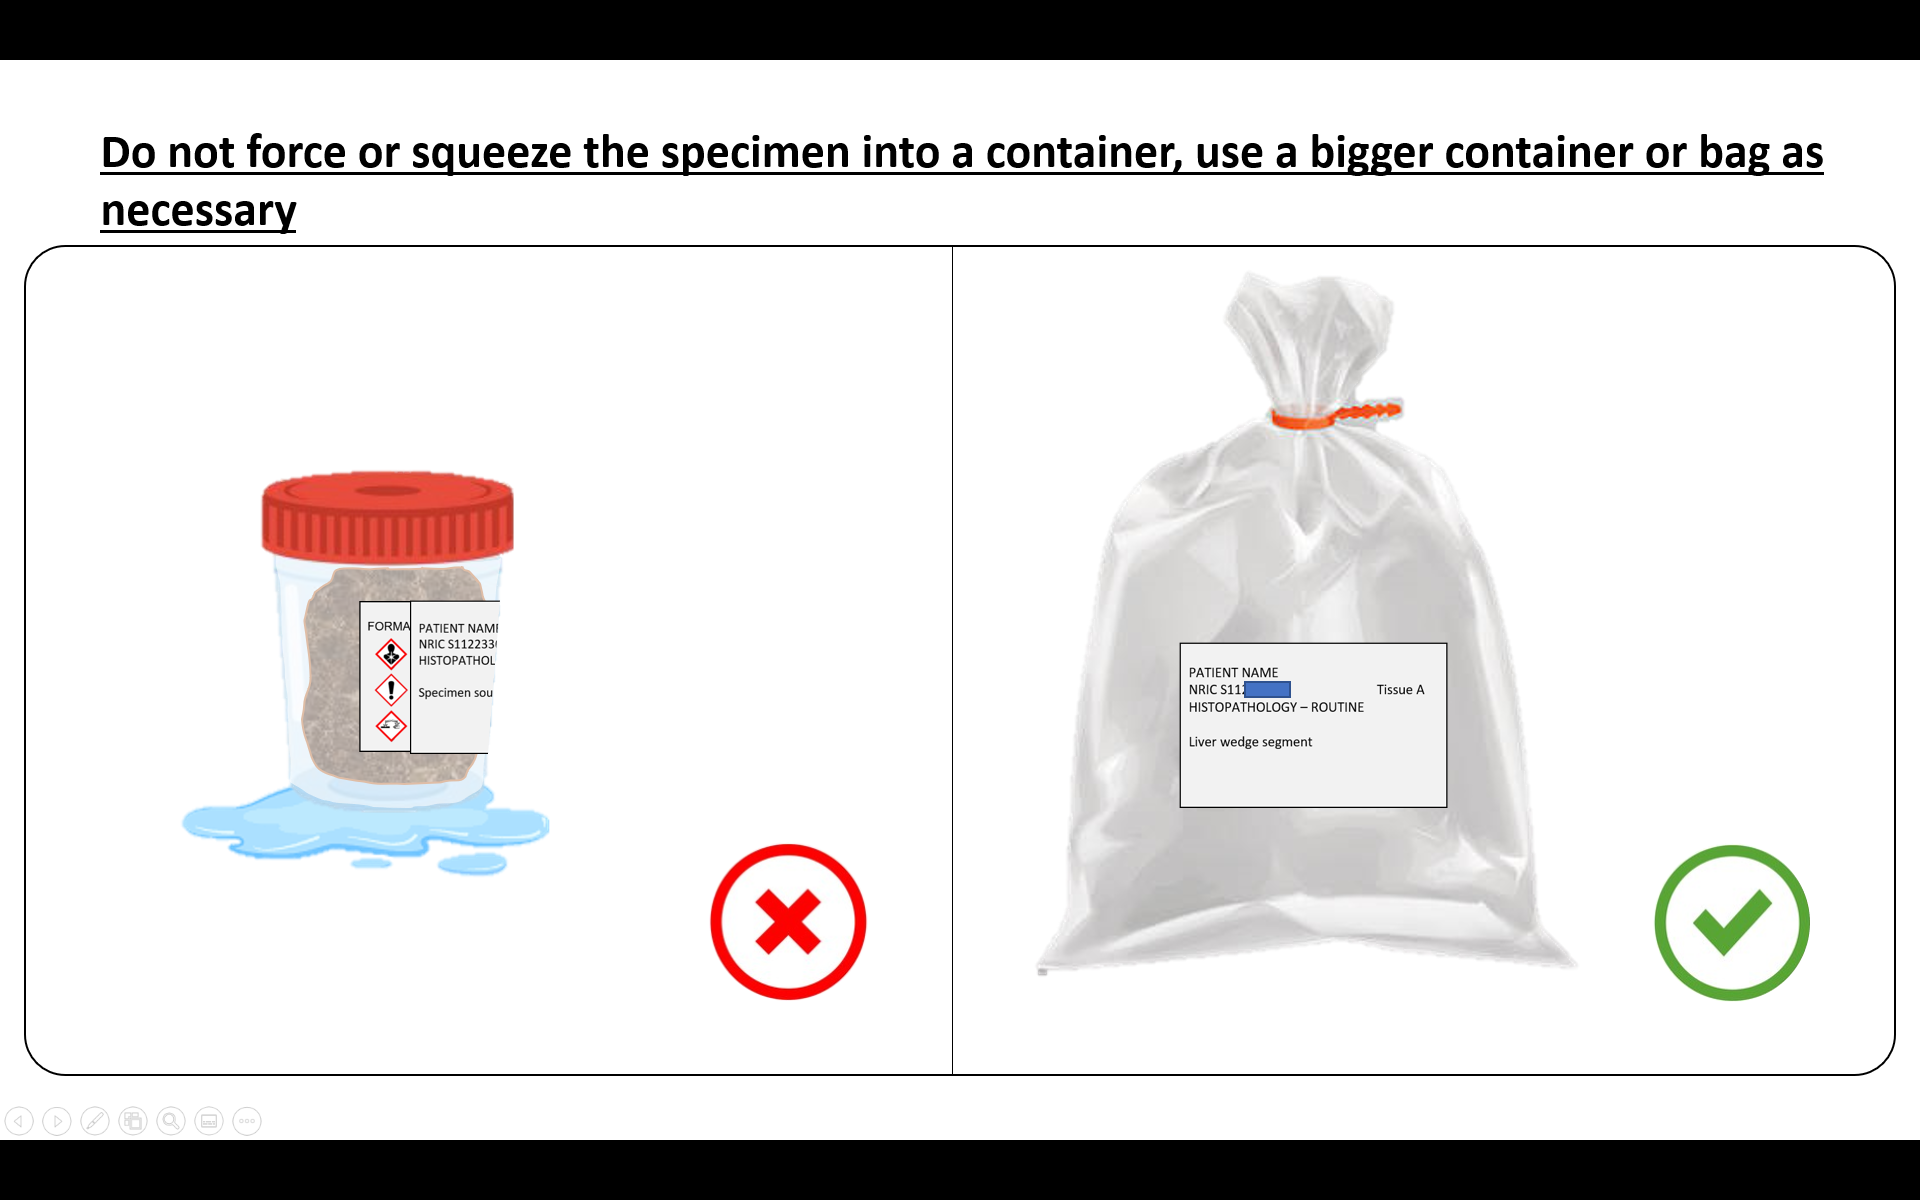
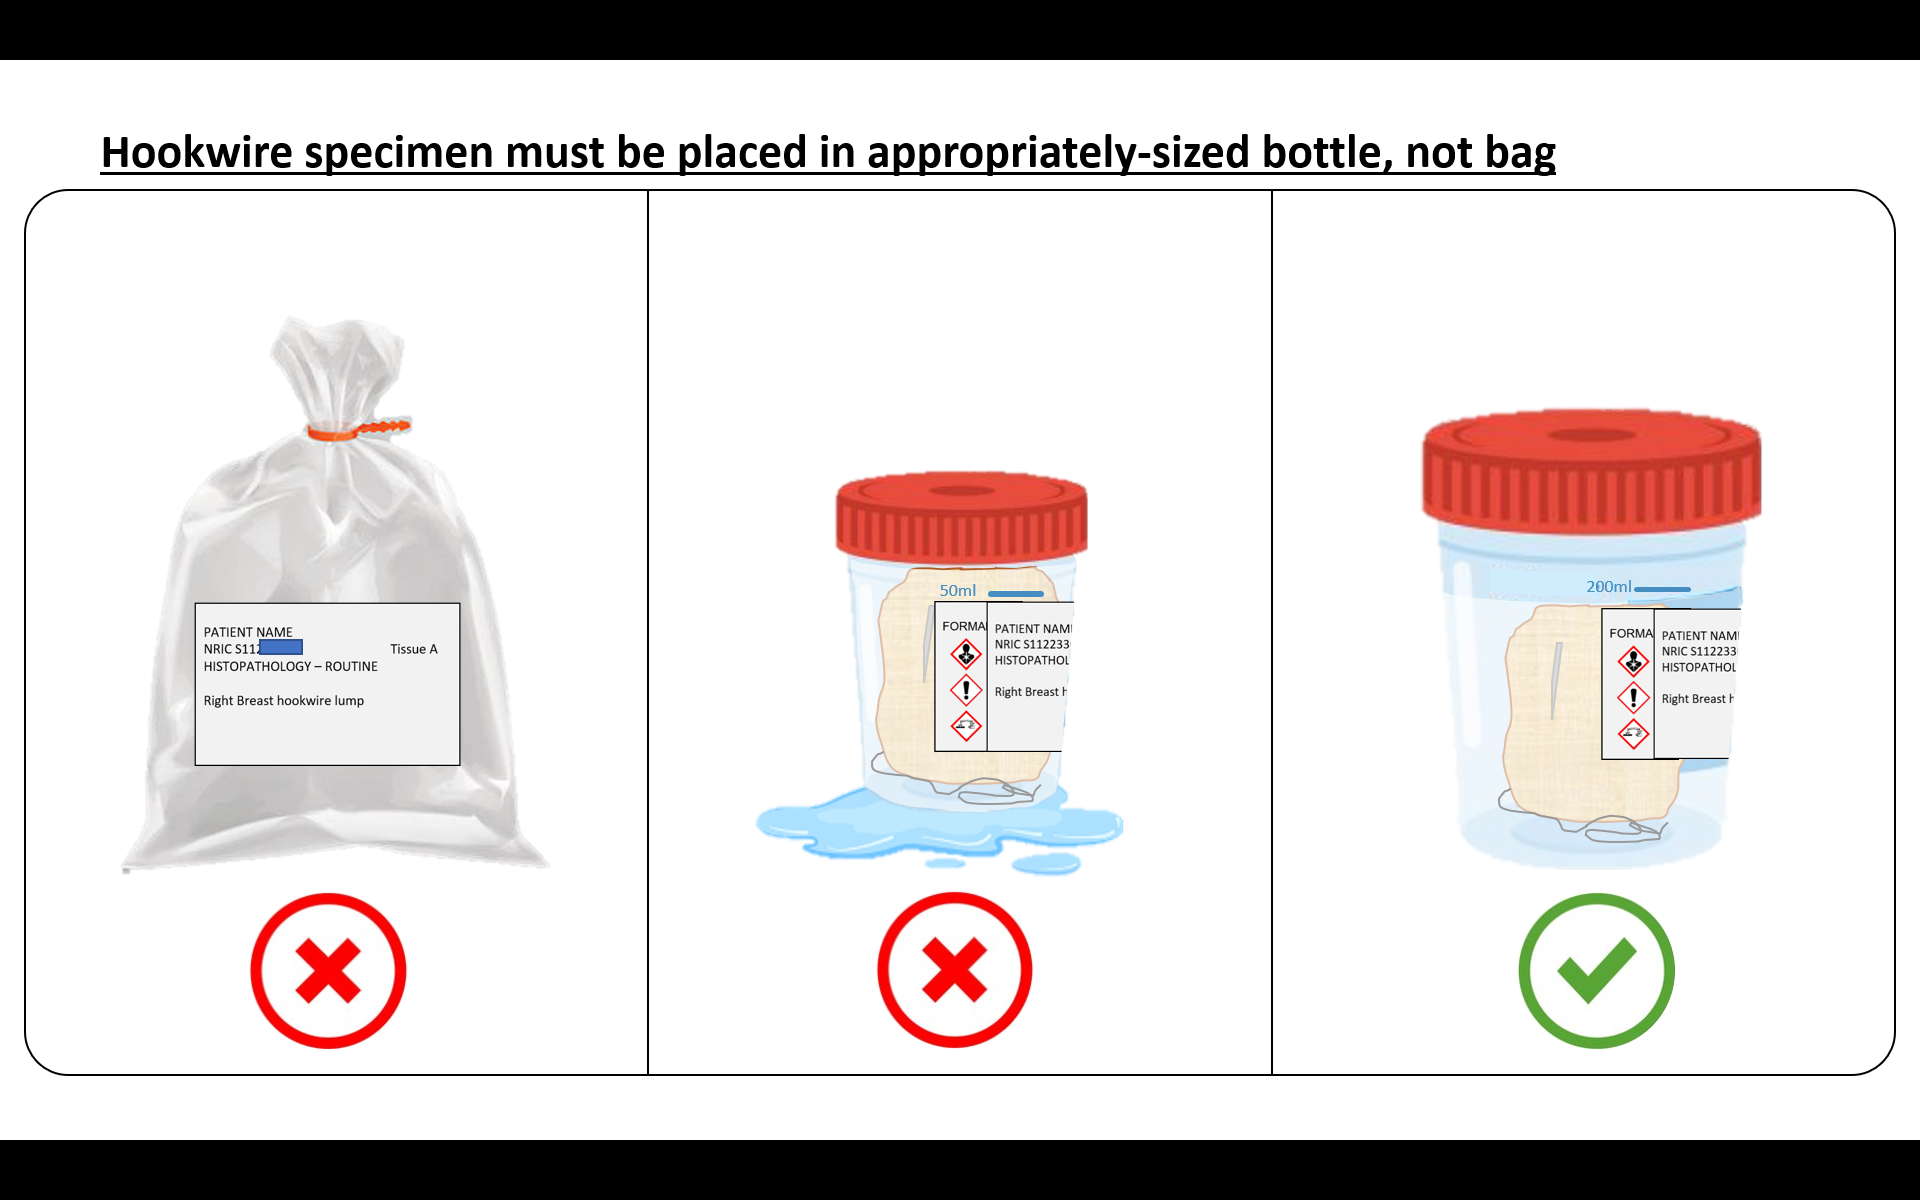
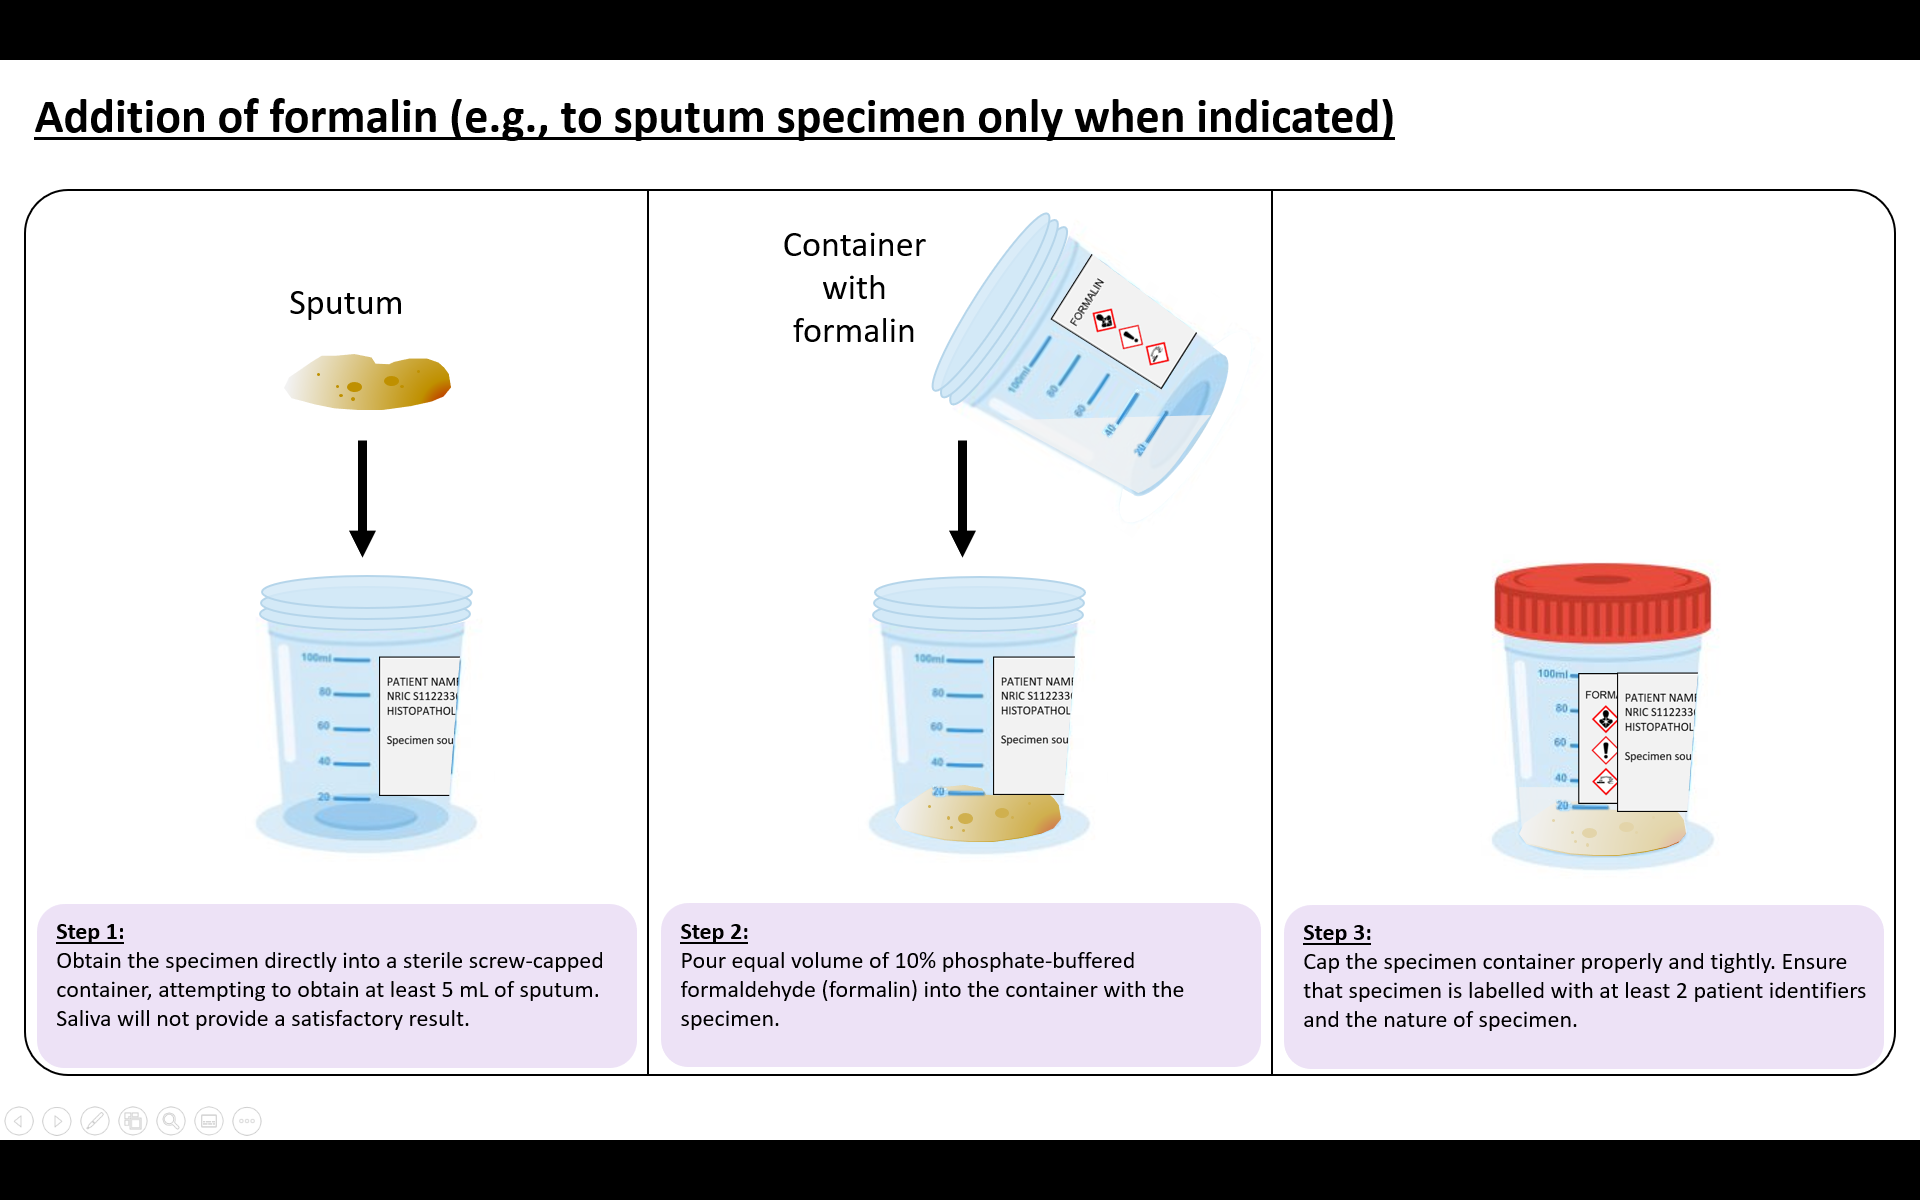
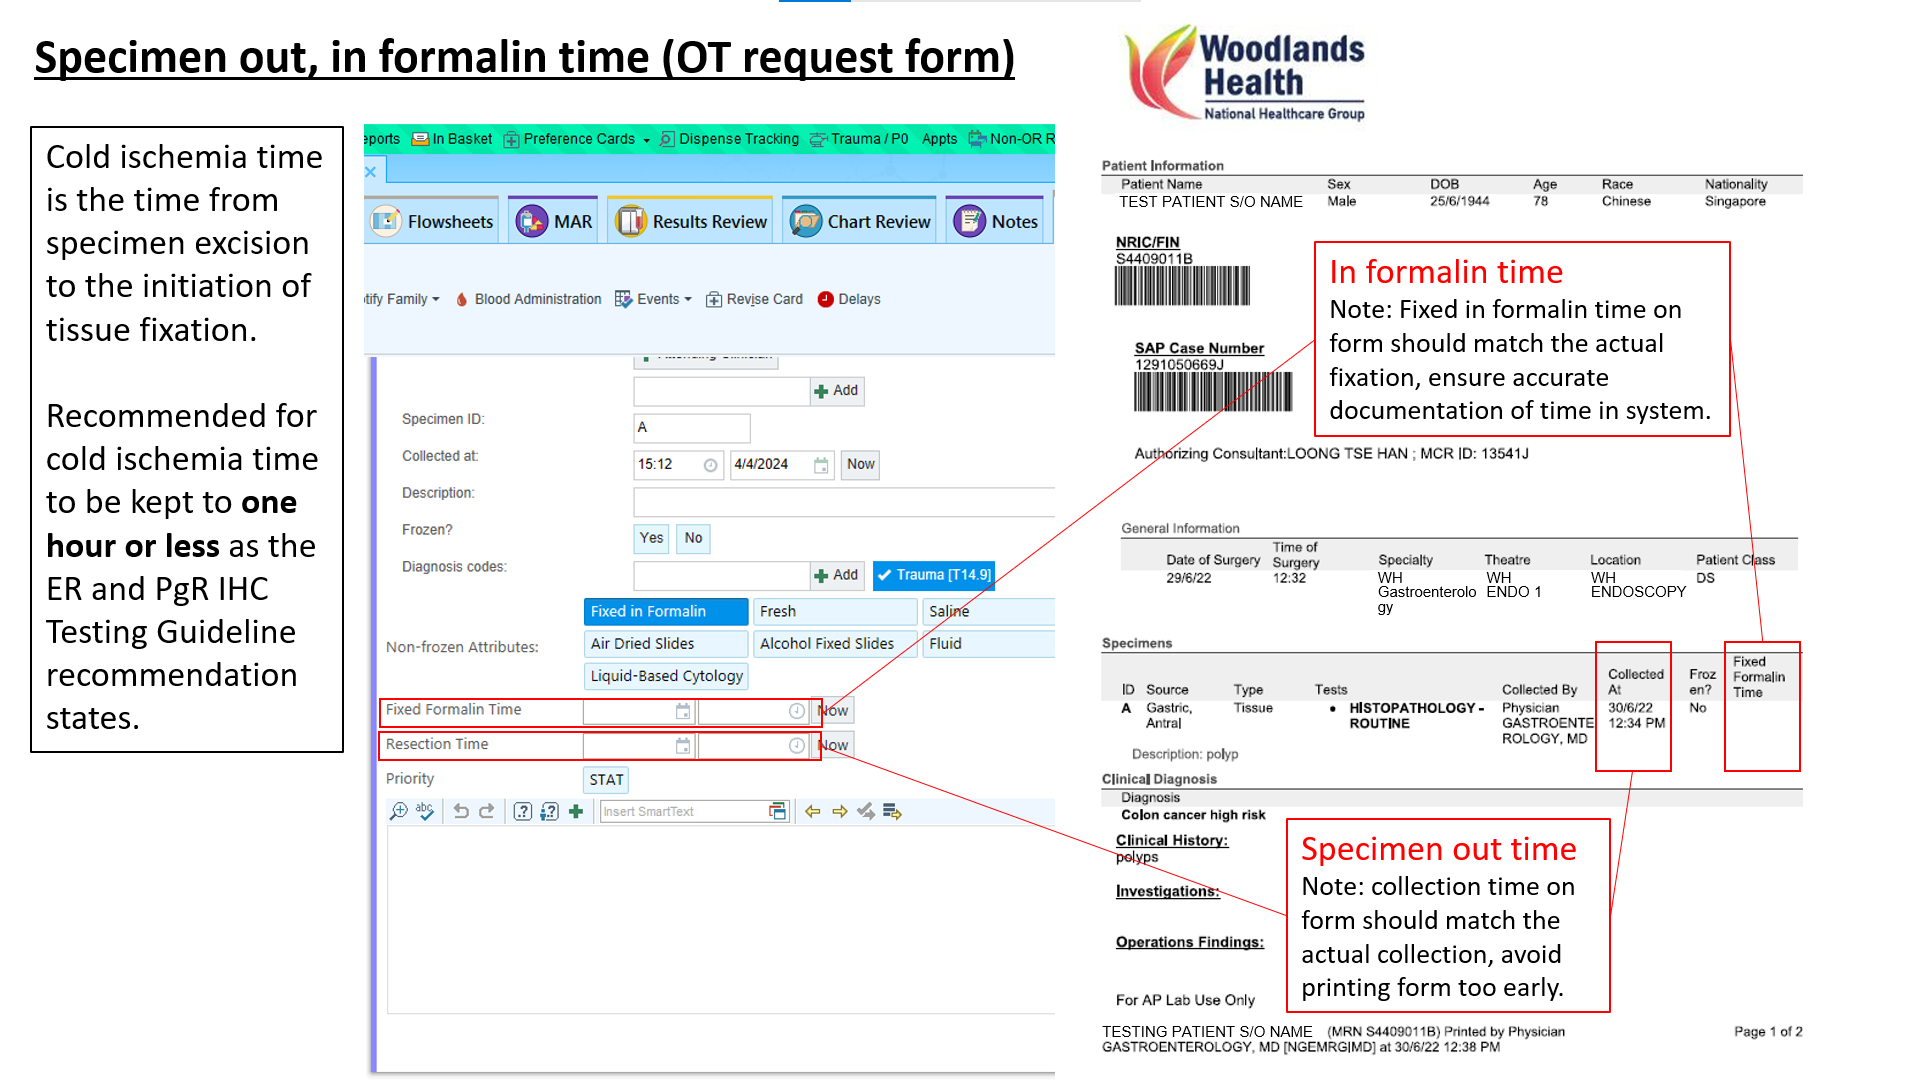
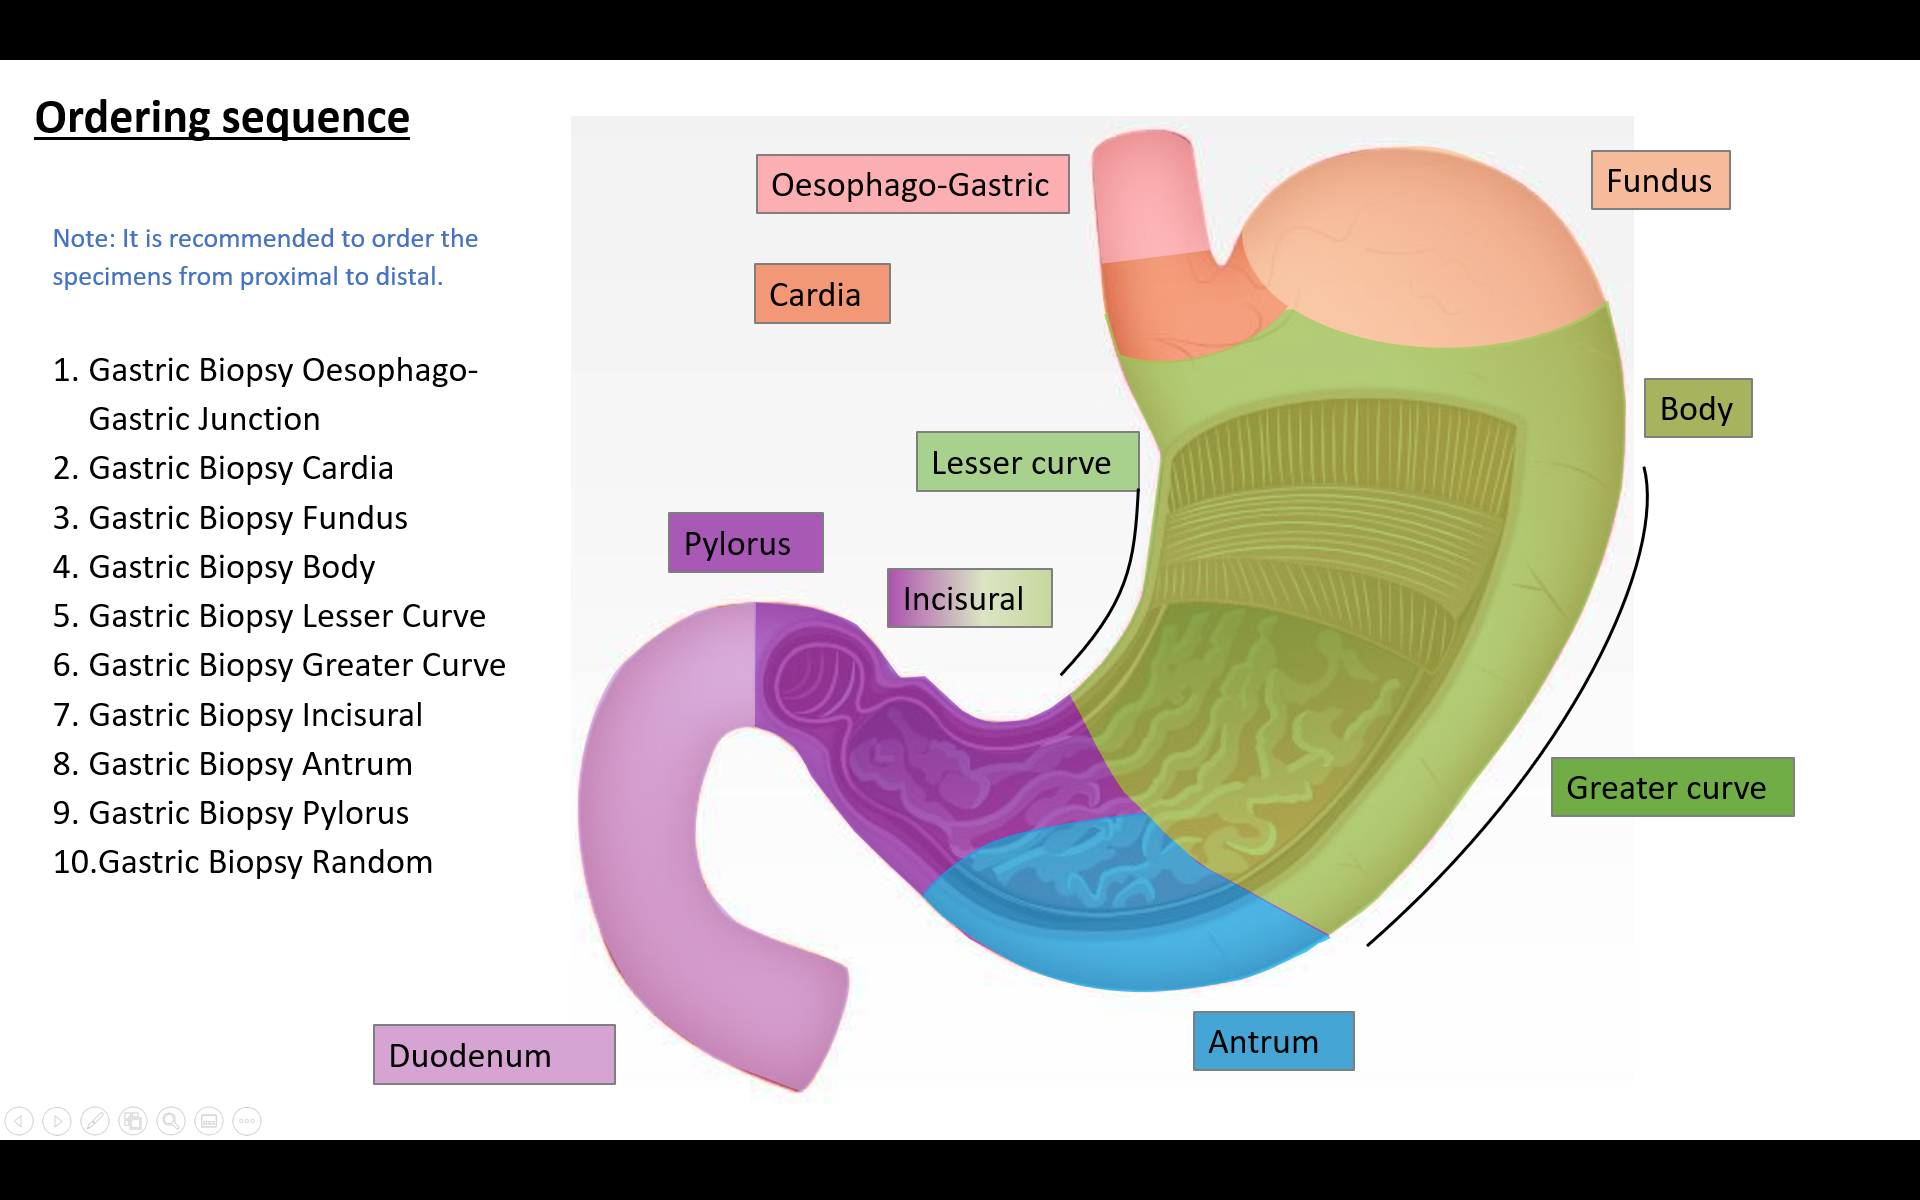
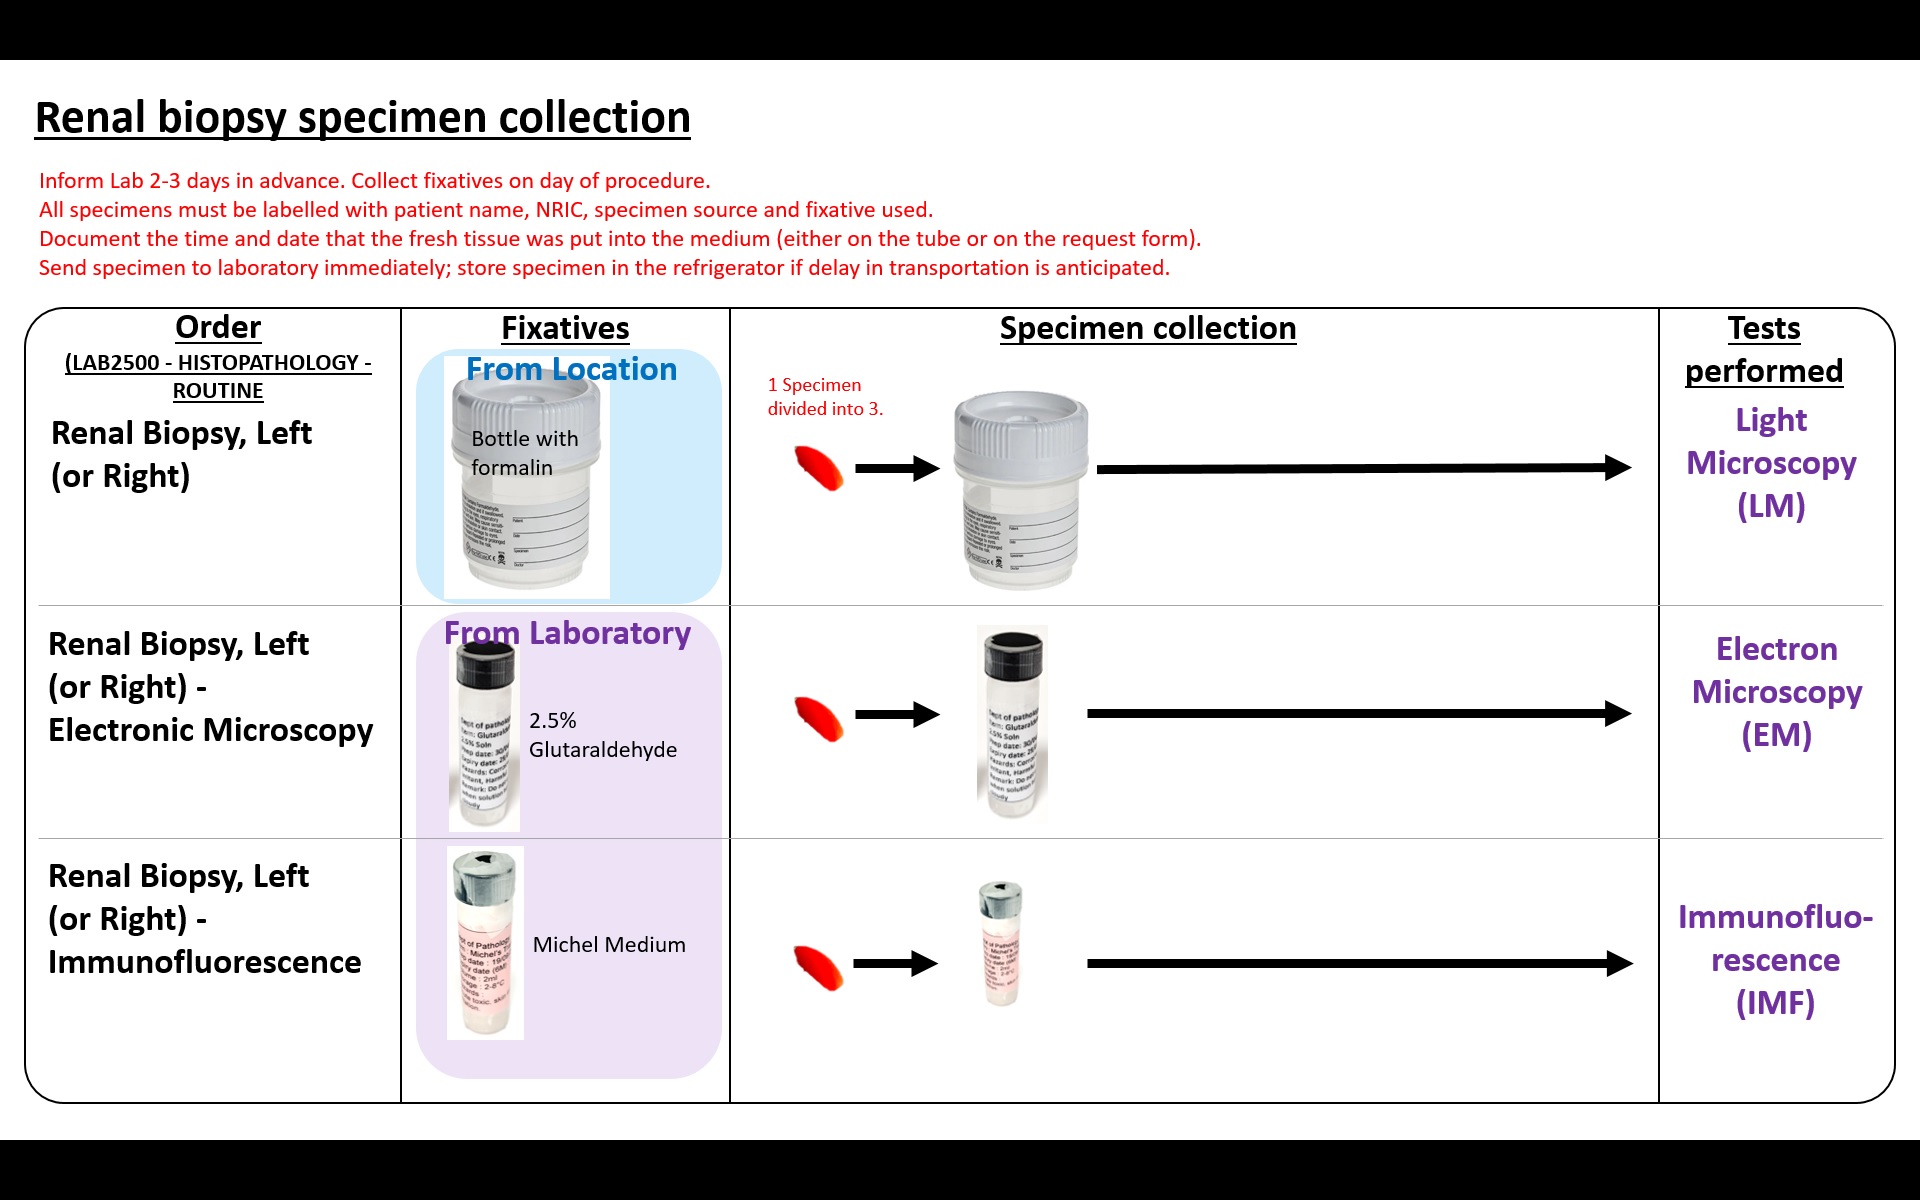
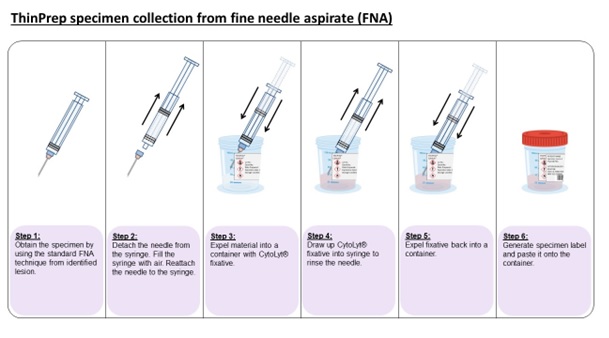
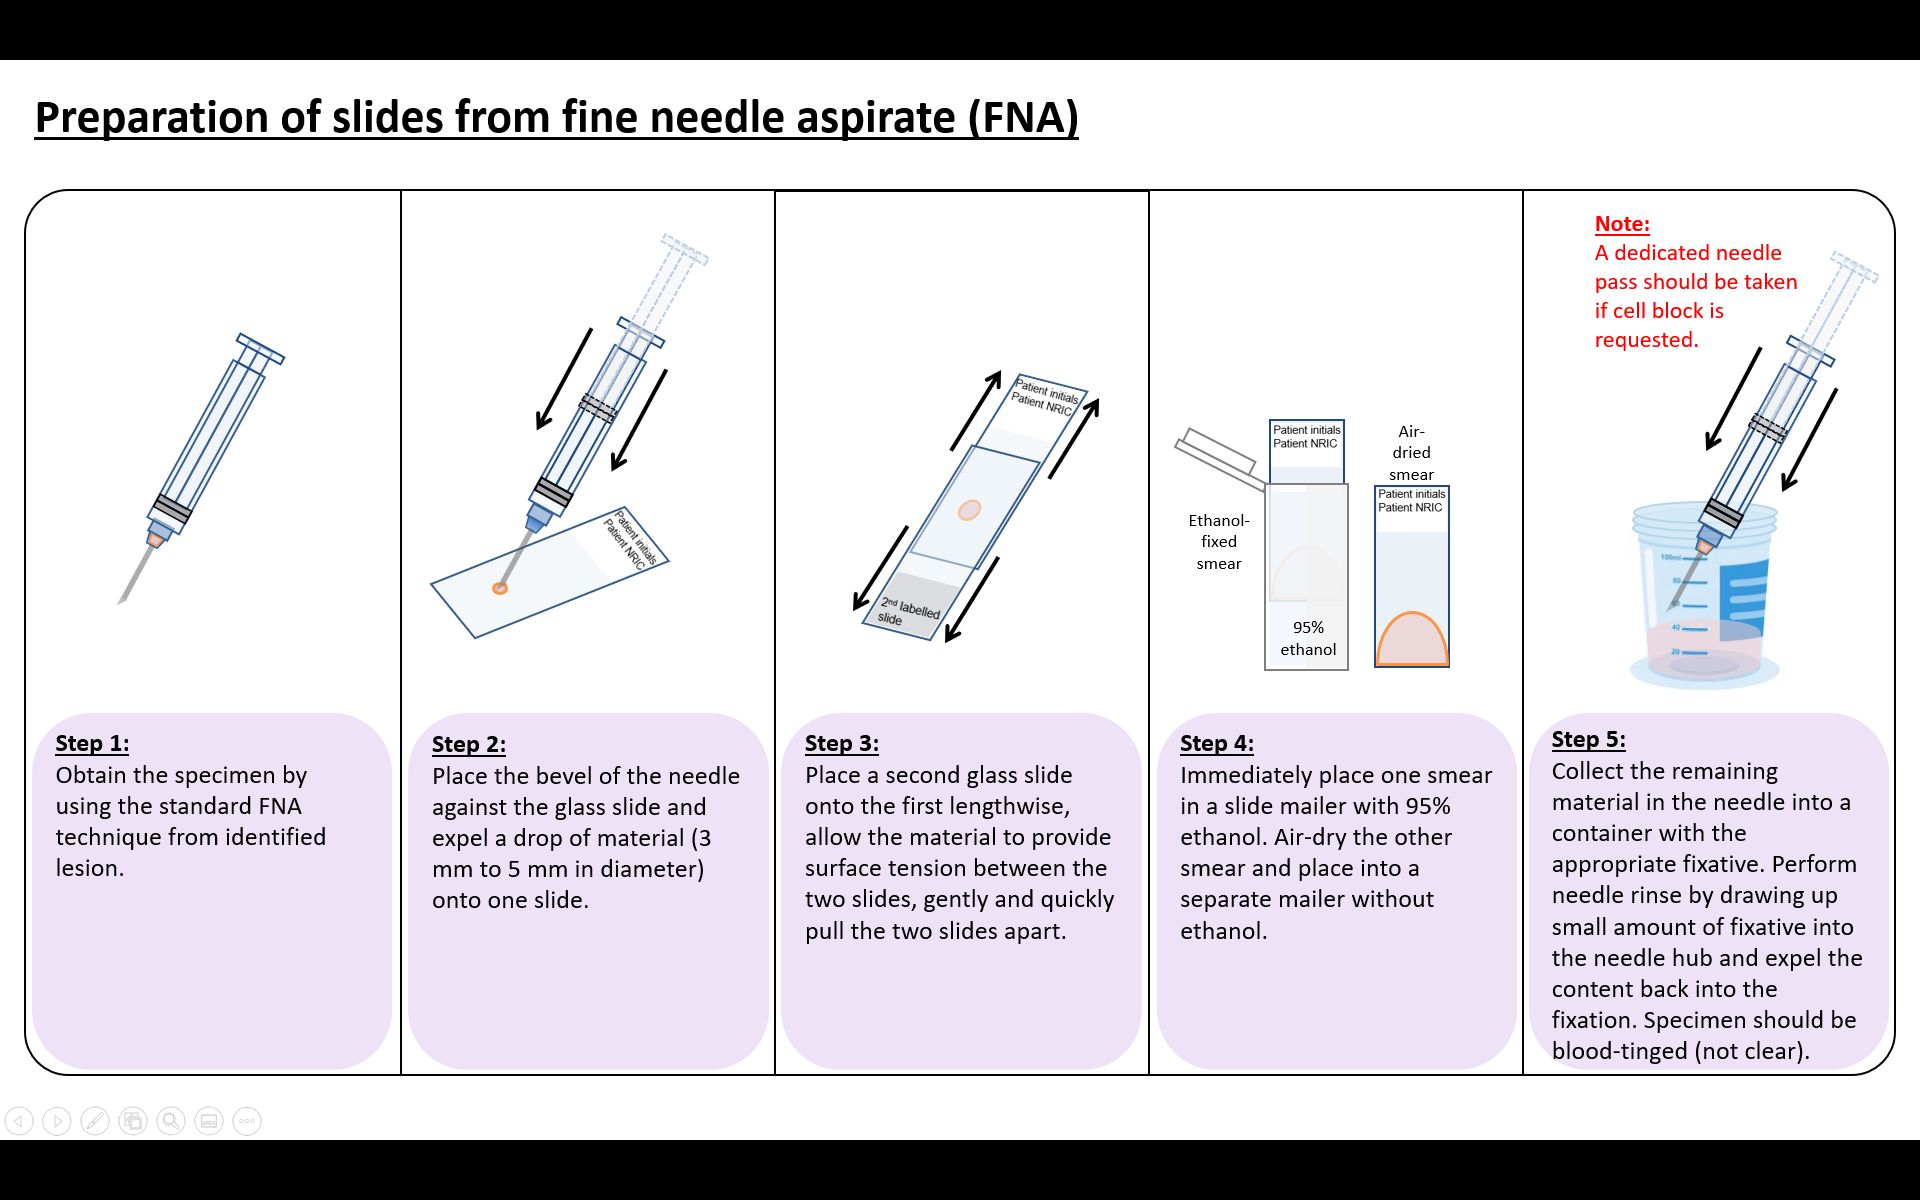
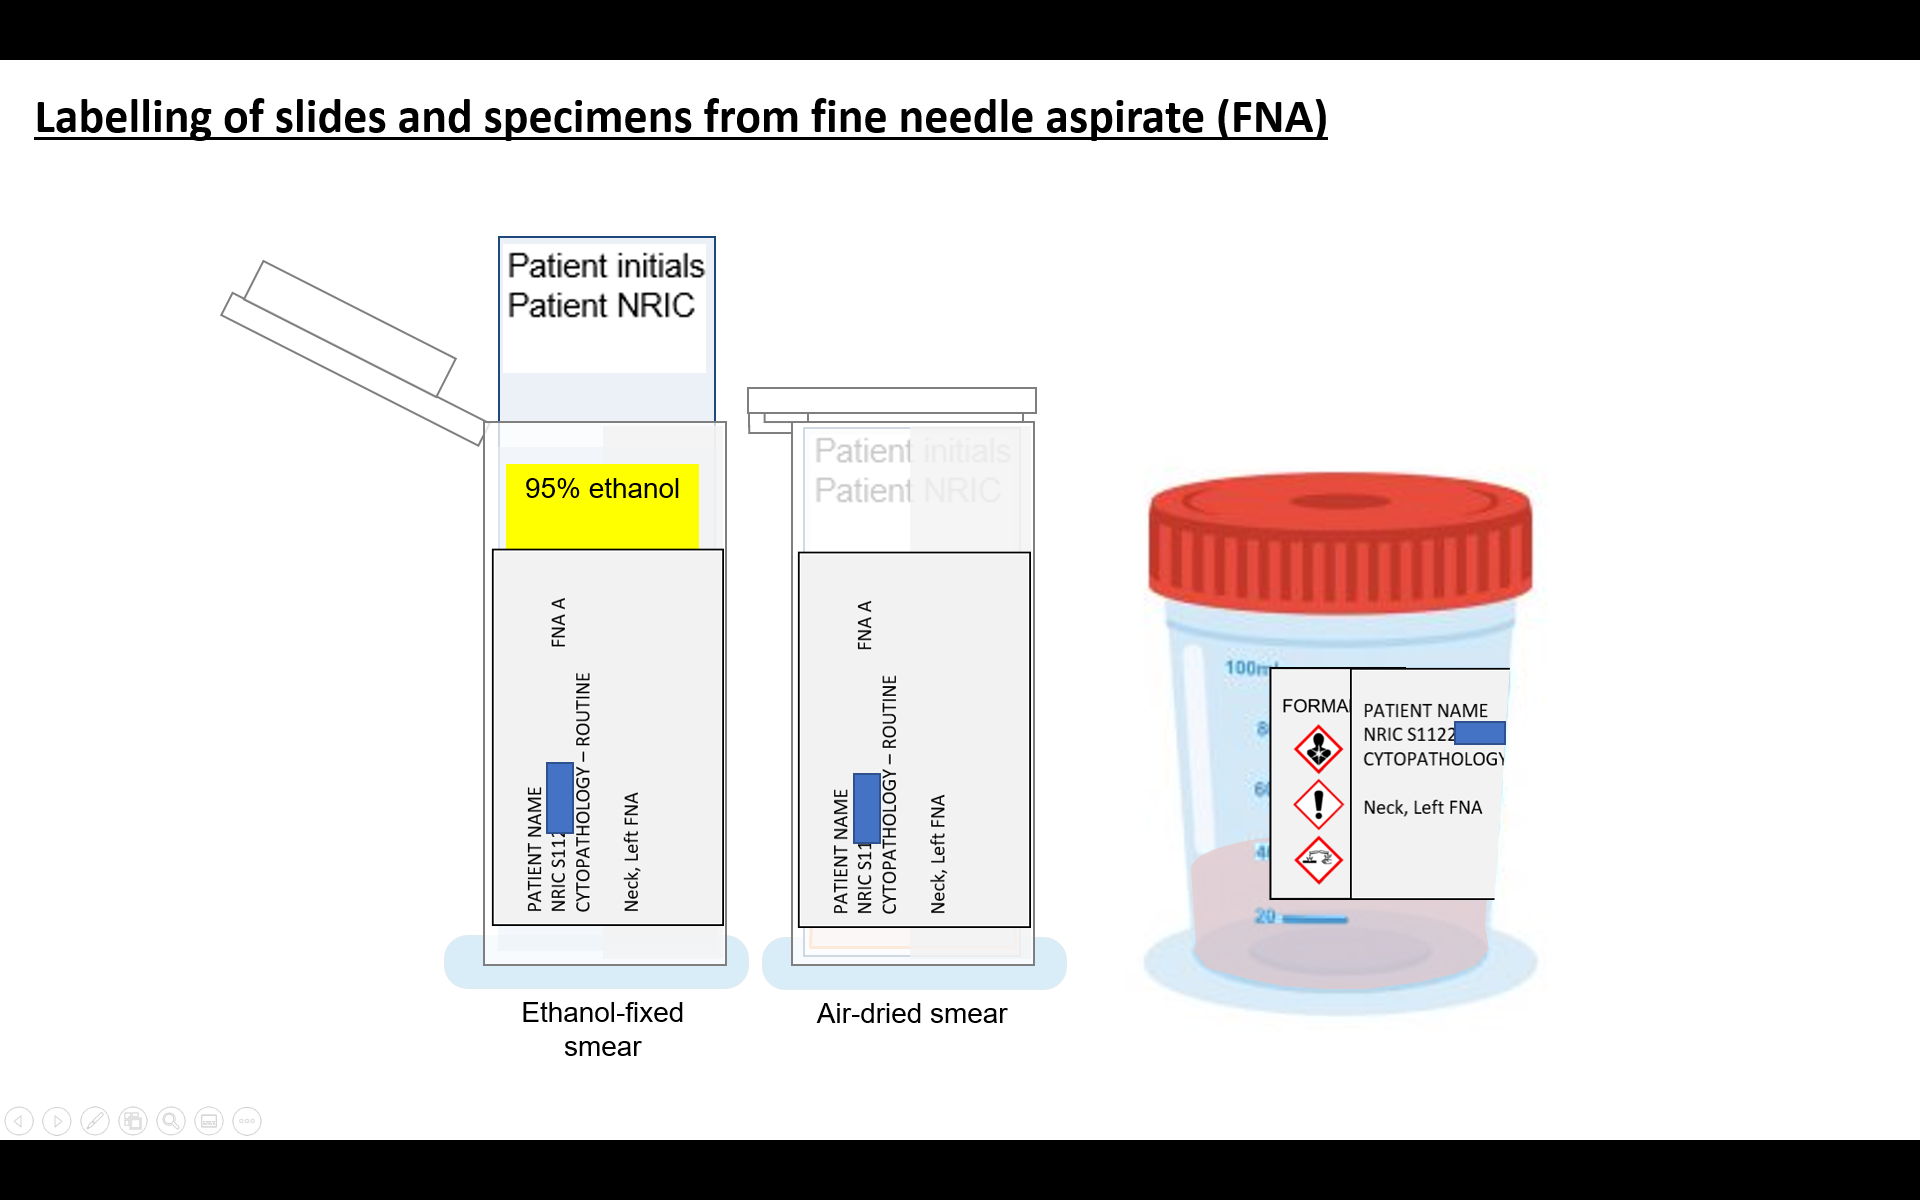
For Anatomic Pathology specimens (Histopathology and Cytopathology specimens):
Specimen source and type must be written clearly and completely if truncated on the printed label.
Resection time and formalin fixation time must be provided for all specimens to enable calculation of cold ischaemic time.
Refer to Instructions on Anatomic Pathology Specimen Collection.
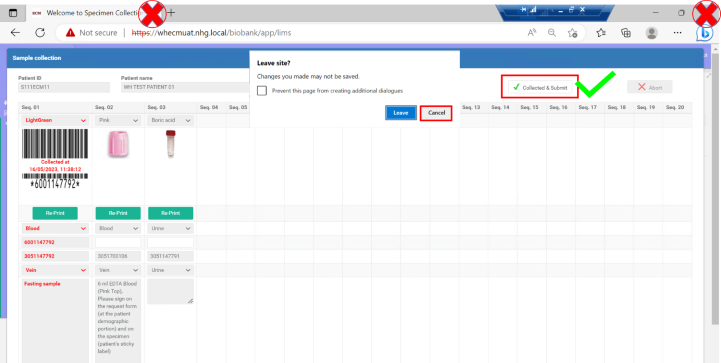
In Electronic Collection Module (ECM):
Scan the labels of the specimens collected and click “Collected and Submit” in ECM (Figure 4). Anatomic Pathology test request do not flow to ECM.
Figure 4. ECM specimen collection screen.
24-HOUR URINE COLLECTION: INSTRUCTIONS FOR PATIENTS
Your urine collection kit contains:
- These instructions
- A labelled orange urine collection container
- A plastic cup to catch your urine
Caution:
1. Keep out of reach of children.
2. The container may contain preservatives. Do NOT remove the preservatives from the container.
3. Keep the container upright to prevent spillage.
4. Urine should not be voided directly into container.
5. In the event of contact with preservatives, wash the affected body parts under running water and call your doctor for further advice.
What is a 24-hour urine collection?
- Plan your 24-hour collection on a day off or the weekend if you are not able or comfortable to do it at work. But, if you go out, remember to take your collection container with you.
- Aim to collect every drop of your urine during the specified 24-hour period.
- If you miss a collection, you should abandon the entire collection and start again on another day, using a fresh collection container.
- Females should avoid collection during a menstrual period.
- For some tests there are dietary and drug restrictions. If in doubt, check with your doctor.
- Do not stop any of your medications unless you have first discussed it with your doctor.
- You may drink as much fluid as you normally would over the course of the collection.
- Begin at the usual time you wake.
- Pass your urine. Do not collect this urine. Flush it down the toilet and note the exact time.
- The collection of urine will start from this time. Please note both the date and time on the collection container label, where it states, ‘Start date’ and ‘Time’.
- Start date:___________ Time:___________
- Stop date:___________ Time:___________
- Use the plastic cup provided to catch all the urine you pass each time you urinate for the next 24 hours. Pour the urine into the collection container after each time you urinate. Rinse the plastic cup with tap water after each use.
- Keep the collection container cool, closed, and protected from light between each time you pass urine.
- The time you pass the last urine specimen should not vary by more than five or ten minutes from the time of starting the collection on the previous day. This is the end of the collection.
- The collection container should be delivered to your clinician as soon as conveniently possible after completing the collection.
- Before you hand over your collection container, please check that your name, date of birth, identification number, and start and finish dates and times are on the specimen. Please also remember to include the request form, if any, with your collection container.
NOTE: Your clinician may want more than one urine test done. If the tests need different preservatives you will need to collect urine in separate 24-hour time periods.
You may also download a PDF copy of this instruction here.
MIDSTREAM URINE COLLECTION: INSTRUCTIONS FOR PATIENTS
What is a midstream urine collection?
A midstream urine specimen is urine that you pass that is not the first part or the last part that comes out. Collecting the second part reduces the risk of the urine specimen being contaminated with bacteria from:
- your hands
- the skin around the urethra, the tube that carries urine out of the body
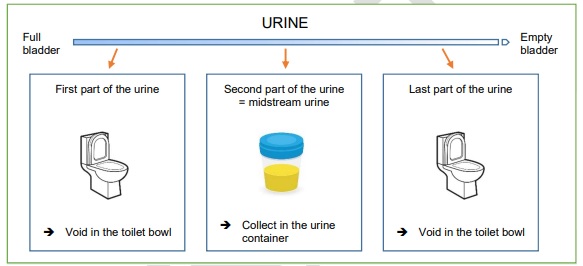
Collection of midstream urine:
- Label the urine container with your name.
- Wash your hands with soap.
- Remove the cap on the container and set it aside. Do NOT touch the inner surface of the lid or the container.
- Clean genital area with towelettes.
- For females, keep the legs apart and hold the skin during urinating.
- For men (if uncircumcised), retract the foreskin during urinating.
- Begin urinating in the toilet.
- Midway through urination, fill the container ONLY HALF-WAY. Do NOT allow the container to touch any part of the skin. Do NOT scrap the urine off using the container.
- Finish urinating in the toilet.
- Screw cap on container and tighten firmly. Do NOT touch inside the cap.
- Ensure that the container is not leaking.
- Wash your hands thoroughly.
- Place the urine container into the biohazard bag, if provided.
- Bring the urine specimen to the clinician or nurse.
You may also download a PDF copy of this instruction here.